Usage: This section is the main configuration screen for Lab Annex. It is strongly recommended that you examine, review, and define these settings prior to using the application.
Navigation: Just click on Settings button.

Settings menu consists of four categories.

Settings menu
| Lab Settings - set the Time Zone |
1. Click on Lab Setting tab under Settings menu.
Lab Settings menu 2. Time Zone field is showing the time zone that the application is currently using. 3. Click on the arrow to the right of the Time Zone field, and select a new zone from the drop down menu that appears. 4. The change is saved automatically. |

| Products - create and maintain the product list |
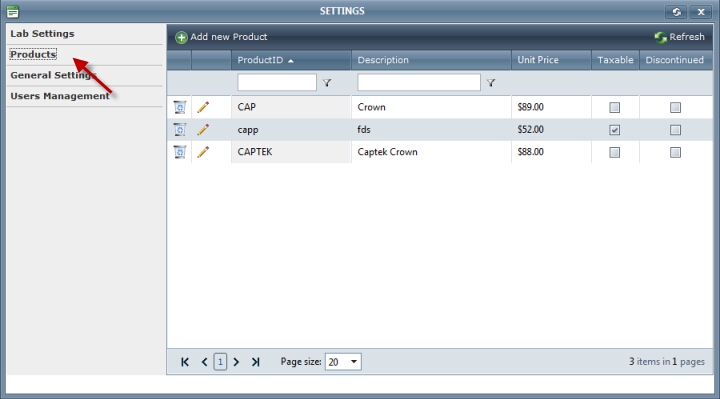
Click on Products tab under Settings menu.
Products menu Available options:
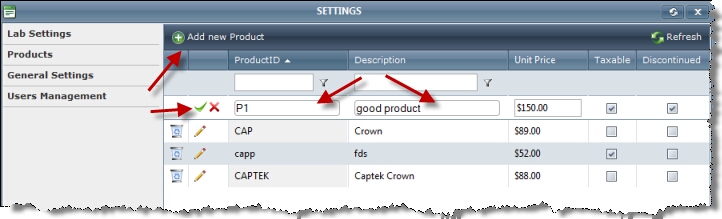
How to add a Product 1. Click on Add new Product.
Add new product on Products menu 2. Enter the ProductId and Description. Note: - Product ID must be unique and you will receive an error if you attempt to duplicate any existing product ID. - Only Users with administrative privileges will be able to create products. 3. Set Unit Price 4. Two options are available: Taxable - set this if Sales Tax applies for this product. Discontinued - can be checked if the product is not available at the moment but you don't want to delete it. While this option is checked, the product cannot be added to a case in order to be shipped. 5. Click Insert icon
How to edit a Product 1. Click on the Pencil icon 2. Make any necessary changes and click the Update icon Note: Product ID cannot be changed after initial creation.
How to delete a Product 1. Click on the Recycle bin icon 2. When prompted to delete click Ok. Note: - You will not be able to delete a product you have used in any previous cases. - Only Users with administrative privileges will be able to delete products. |
| General Settings - set date format an customer view |
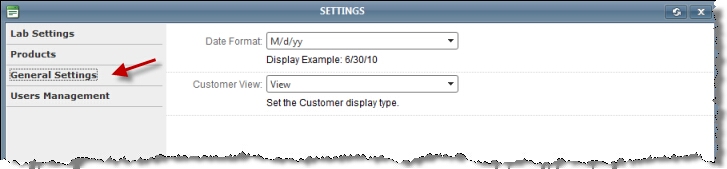
1. Click on General Setting tab under Settings menu.
General Settings menu 2. Date Format and Customer View fields are showing the setting that the application is currently using. 3. Click on the arrow to the right of the Date Format field, and select the format from the drop down menu that appears. Under the field an example will show how the date will be displayed. 4. Click on the arrow to the right of the Customer View field, and chose between View and List to set the desired customer display type. Note: List will display all customers in a grid while View will display details of the currently logged in customer. To change this display type you can either come on this form, or simply click on Browse button on the customer form. 5. The changes are saved automatically. |
| User Management - create and maintain user names |
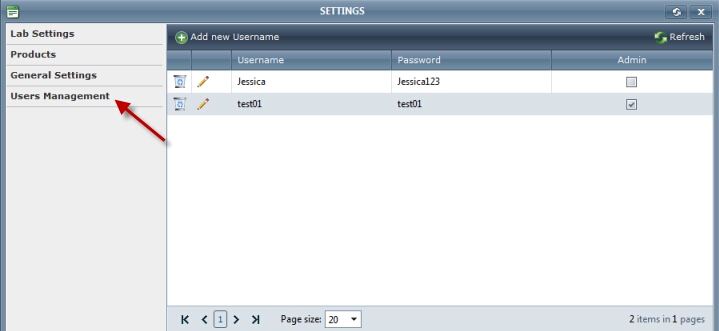
Click on Users Management tab under Settings menu.
Users Management menu Available options:
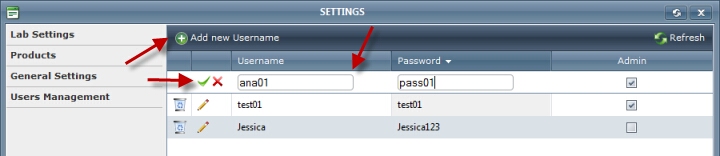
How to add a Username: 1. Click on Add new Username.
Add new user on Users Management menu 2. Enter the desired Username and Password. Note: - Username must have minimum 5 characters, otherwise an error will be received. - Password field must have minimum 6 characters. - All Usernames must be unique as you will receive an error if you attempt to duplicate an existing Username. 3. Check Admin option to give Administrative privileges to this user Note: Users without administrative privileges will not be able to delete any record on any page, change any of the settings, create statements and receive payments. 4. Click Insert icon
How to edit a Username 1. Click on the Pencil icon 2. Make all necessary changes and click the Update icon
How to delete a Username 1. Click on the Recycle bin icon 2. When prompted to delete click Ok. |
See also: