Add/Edit Case

Top  Previous  Next

Usage:

This topic describes how cases can be created, edited and what are the possible operations that can be done using cases.

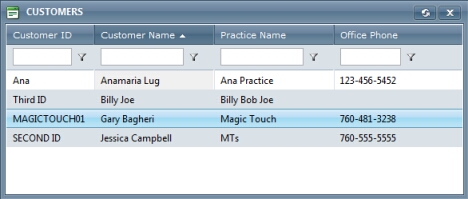
Before you start creating cases make sure that you have the Customer for which you want to create the case and the products that will be added to the case.

Please use the links to find out additional information about the prerequisites that are needed:

How to create a Customer
How to find a Customer
How to add Products to the database


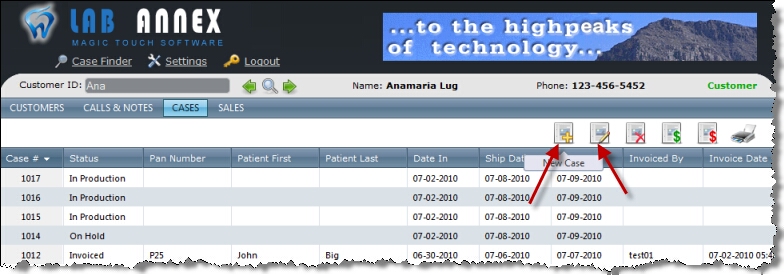
Navigation: Cases is the third menu option after Customers and Calls & Notes. All existing Cases are displayed in the grid.

To Add a new Case click on New Case button.

To Edit an existing Case, select the case by clicking on it in the grid and click on Edit Selected Case button.

cases navigation path 2

Add or edit Cases

Another option to create a new case is: click on Cases > New Case button,
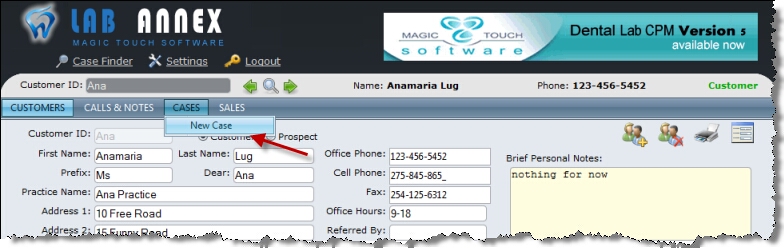
cases navigation path 1

New case path

How to:


hmtoggle_arrow1Add new Case

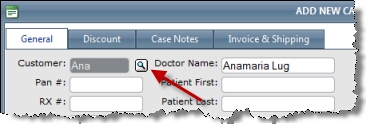
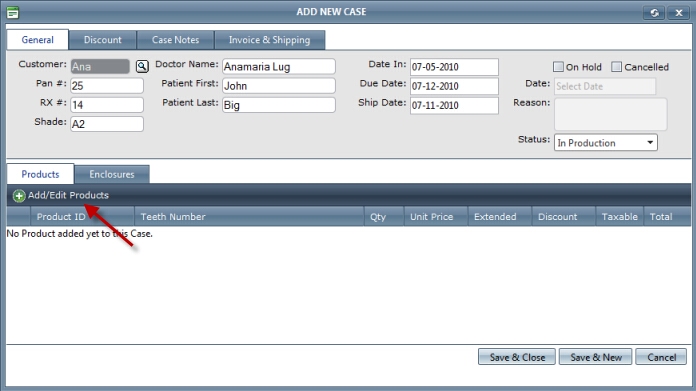
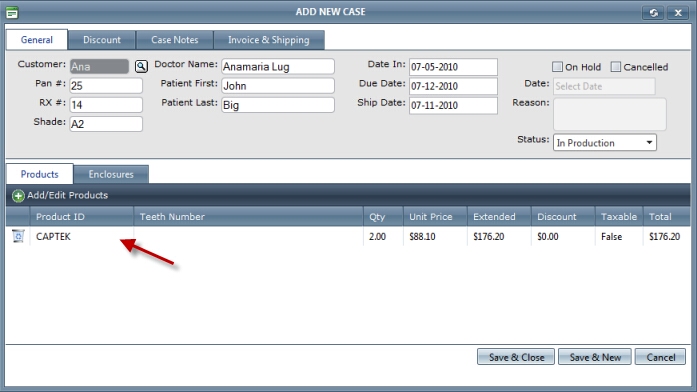
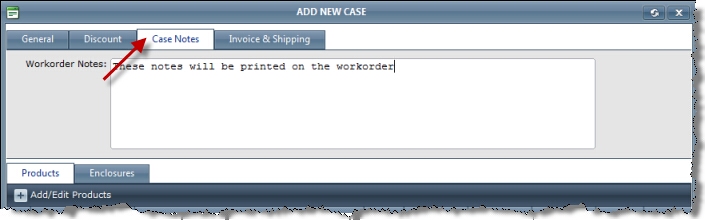
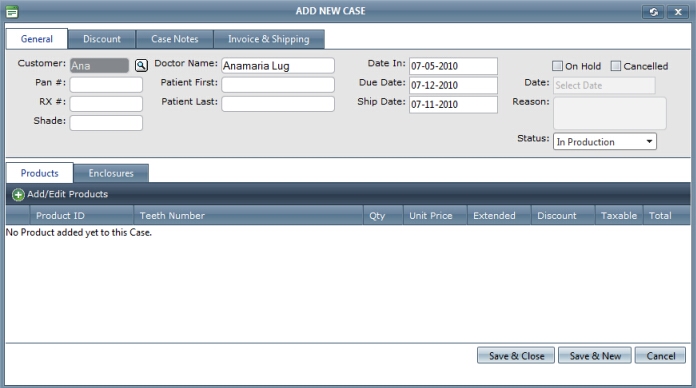
1. After the New Case button is clicked as it is shown in the Navigation section, the Add New Case form will open.

New Case form

New Case form


2. The Case form is divided in two main areas:

The upper area that includes four tabs:
1.General -> This tab contains the basic information regarding the Customer, Patient, Doctor, as well as the Processing Dates and the Case status.
2.Discounts -> This tab is where Discount values are introduced if they are offered.
3.Case Notes -> Workorder Notes can be entered here.
4.Invoice and Shipping -> This tab displays the Invoice or Uninvoice  buttons and several fields that display different amounts. Shipping address and Invoice Notes should be entered here.


And the lower area with two tabs and the Save and Cancel buttons.
1.Products -> On this tab the Products are added.
2.Enclosures -> On this tab the Enclosures are added.

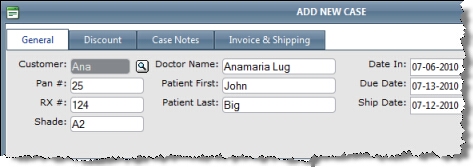
3. The Add New Case form has several fields populated by default:

CustomerID and Doctor Name are populated with information of the selected Customer.
Date In is set to current date.
Ship Date is set to six day after Date In .
Due Date defaults to seven day after Date In.
Status is set by default to In Production.

4. Without entering any other information you can click on the Save and Close button. The form will close and the case will be created. It will have a number assigned by default.

Note: Clicking on Save and New will close the existing Add New Case form creating a case and also will open another Add New Case form in order to give the ability to create another case.

Although the case was created it doesn't contain relevant information. Next will be presented all possible operations that can be done when case is created or edited.

hmtoggle_arrow1What can be done with a case

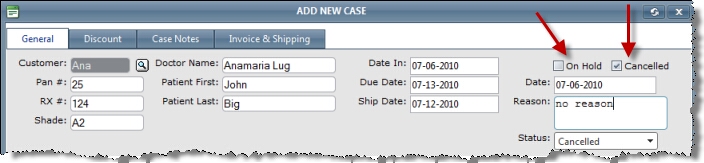
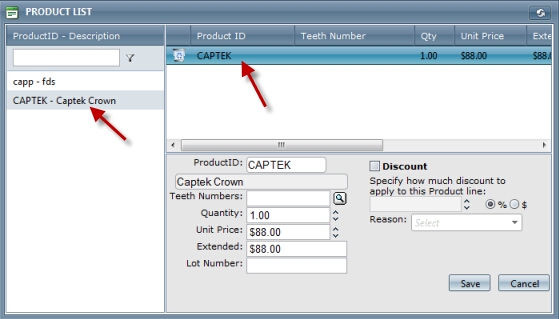
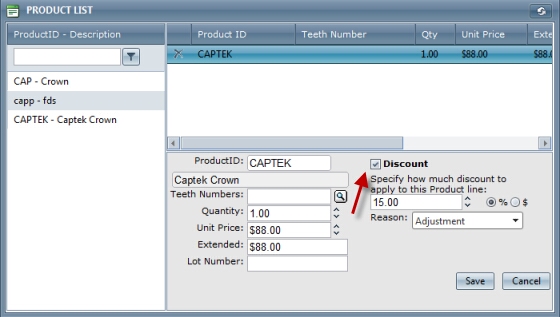
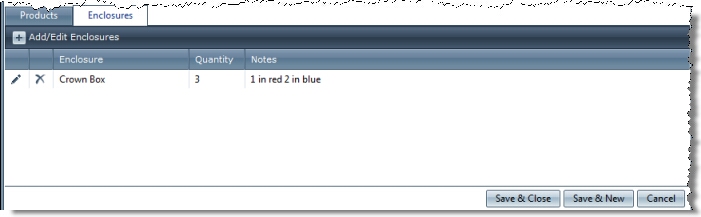
This section will describe all possible operations that may be done using a case. Not all presented operations can/must be applied to all cases. Each case is created to satisfy the customers need and for this reason cases contains different information.

To illustrate all available options a new case will be created, but all operations can be applied to an already created case that is opened for editing. Only exceptions is the Invoiced Case that cannot be updated.


1. If you decide that you want to create this case for a different customer then click on the magnifying glass next to the Customer Id field

changing customer on cases form

Change Customer ID

2. Select the customer for which this case will be created.

select the customer while case is created

Select new Customer

3. The customer that is selected will be displayed in Customer fields and the Case will be assigned to him.


1. Enter Pan Number, RX number, Shade and Patient Name

General tab details

General tab on Case form

1. Check On Hold or Canceled checkbox

Set status to on hold or canceled

Change Status

2. Date and Status are automatically populated, Date with current date and status changed based on your selection.

3. Enter Reason for changing case status.

4. Case number will have the status updated right after it will be saved

To add a product to a case you have to make sure that this product is already added to the database. If not please add the product first in Settings . Products section of this application.


Select the Products

1. Click on Add/Edit Products button on Product tab.

add new case

New Case form with Products tab selected

2. The Product list form opens with the available Products displayed on the left side.

Products list

Product list form

3. Double Click Product in the left panel to add it to this Case.

product is added to the case

Product was selected

Note: You can select as many products as you wish. All you need is to double click on the product you wish to add to the case.

4. Click on the selected product and details will be displayed on the lower right panel.

Add Teeth numbers.

5. Click on the Magnifying glass next to the Teeth Numbers to open Teeth Chart form

teeth chart

Teeth Chart form

6. You can select Single tooth or multiple teeth using the Bridge option.

7. To select teeth click on them in the image. Number of the selected tooth will be displayed on the form lower part and has Remove option to undo the selection.

8. Click Save when done. Teeth numbers are displayed.

teeth selected

Teeth Numbers are added

Note: Quantity is automatically changed when teeth are selected depending on how many are entered. In this case we have a single tooth and a bridge of three teeth so the quantity is set to four.

9. Change Quantity and Unit Price by clicking on More or Less arrows.

Note: Extended represent the Total Price (Quantity multiplied by Unit Price)

Add Discount to Case Products - different discount values can be added to different products.

10. Select the Discount Checkbox.

case product discount

Discount applied to the selected product

11. Enter Discount Rate

12. Select between Percentage or Flat Amount

13. Select Reason from the drop down field

Note: The Discount will be set only for the selected product.

14. Click on Save to finalize the process

product is add to a case 2

Products are added to the Case

Note:

- To Edit the Product list follow the above steps. You can modify the product list by adding or deleting products, or you can modify a selected product details by changing quantity, unit price or adding/removing Discount . You cannot make changes on  Product Name, Description or Extended fields.

- To Delete a product you need to click on the Recycle Bin icon in front of the product that will be deleted and confirm your choice. You can do this in the Products tab of the New Case form, or also in the Add/Edit Product form.

1.Click on Add/Edit Enclosures button on Enclosures tab.

add enclosures to a case

New Case form with Enclosures tab selected

2. The Case Enclosures form is displayed.

add enclosures to a case 2

Case Enclosures form

3. Enter Enclosure -select one of the available enclosures from the drop down list

4.Enter Quantity - manually enter how many selected enclosures you wish to order.

5. Enter Notes - type in any necessary information

6. Click on Save to finalize the process

enclosures are added

Enclosures are added to the Case

Note:

- To Edit the Enclosures list follow the above steps. You can modify the enclosures list by adding or deleting enclosures, or you can modify a selected enclosures details by changing quantity or notes .

- To Delete an Enclosure you need to click on the Recycle Bin icon in front of the enclosure that will be deleted and confirm your choice.


Every product offered to customers has a certain price. This is the Unit Price entered on Product form when the product is added to the application. The product price can be changed when the product is added to a case. There is also the possibility to offer promotional prices to certain customers, known as Discounts.

Discounts can be applied

Different  for each product. Discount will be set when product list is added or edited for some or each product individually. See Add Products > Add Discount to Case Products section for more details
To all products of the case by setting Discount on the case form and not on a specific product.

Note:

- Discounts may be applied as a percentage or as a fixed value that will be decreased from the initial price of the product.

- Selected Discount value will be applied to all products and will overwrite the individual discount values set for products if there were any.

1. Click on Discount tab. Is the second tab on the top of the Add New Case form.

Case discount

Discount applied to all case products

2. Select the Discount Checkbox.

3. Enter Discount Rate

4. Select between Percentage or Flat Amount

5. Select Reason from the drop down field

Note: The Discount will be applied to all products added to the case

6. Click Save

1. Click on Case Notes tab

Case Notes

Case Notes that will be printed on Workorder

2. Enter text in Workorder Notes field. These Notes will be printed on the Workorder.

1. Having the case created select in in the Cases form grid.

2. On call Notes related to the selected Case click on Add Call

create call for a case

Add Call notes to a case

3. Phone Calls and Notes form opens and has Case Patient Information populated by default.

assign call to a customer

Call form with case number populated

4. Enter specific information such as Call Type, Description, Talk(ed) to, Status and any other notes you wish to have logged in the database.

5. Click Save. Created call is displayed on the Cases form when the corresponding case is selected and also on Calls and Notes form.

To find out more about Calls and Notes please see this topic.

Invoice and Shipping - for details please see How to Invoice/Uninvoice a Case topic.